Friday, February 29, 2008

Planning the Window Box

I get overwhelmed easily. This is true in just about every area of my life. I can sit down and plan a project out for hours or even days, but as soon as I go to the store to purchase the required items, even with list in hand, my head starts spinning at all the options in front of me and I can't think straight. I end up getting the wrong things and forgetting half of what I needed. I think I might be a little retarded, or at least have a slight case of ADD.

This is a real problem for me when trying to plan a flowerbox. There are just too many choices of flowers out there. I get a plan in place, but when I go to buy the flowers, either they don't have what I want and I am unable to amend my idea on the spot, or they have plants that I never considered that look much more appealing than my current plan. Either way, I am not good at changing my plan in a hurry, but when I am at the store, I really want to buy something so I can get the project finished, and I end up making bad decisions.

To avoid this problem while planning the flowerboxes this year, I decided to buy my flowers on-line. This way I can peruse all the flower options and make a much more informed and easy-going decision.

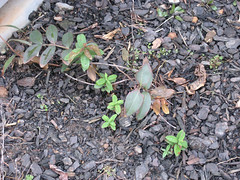
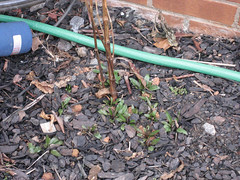
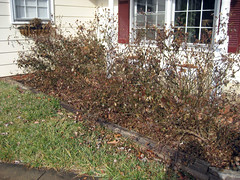
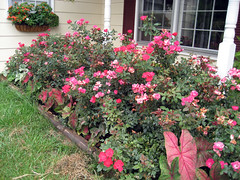
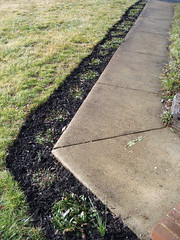
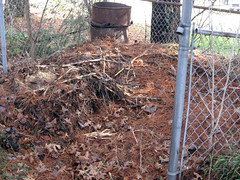
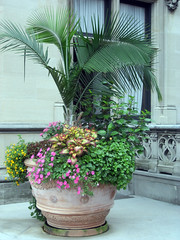
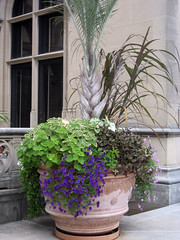
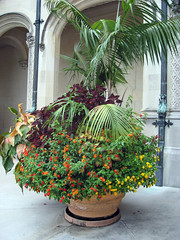
This is the flowerbox I am currently planning. It sits in blistering hot full sun the entire day during the Summer, and I get tired of lugging water to it by mid-August, so my plant selections have to be very hardy in harsh Summer conditions.


I know I want a plethora of flowers filling this box, much in the style of an English cottage garden. Flowers should be towering over the box and sprawling out of it, and it should be cram-packed, but in a good way. I like purple and yellow in this spot, because I think those colors complement the burgundy box and light yellow paint of the house. My latest effort to plan the perfect flowerbox led me to the following plants.

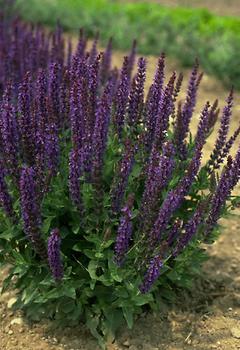
Three clumps of East Friesland Salvia as the strong anchor plants. This perennial will grow to 18" in height and spread to 16". I like the sturdy upright spikes of intense deep purple. This plant is also remarked as being good for containers and disliking wet feet in Winter, which is good, because this container doesn't get a drop of water from me in Winter.


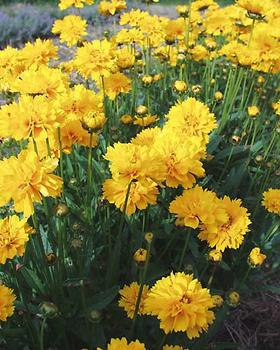
Early Sunrise Coreopsis will provide a rich buttery yellow to the combination and also soften up the bold spikes of the Salvia. Coreopsis LOVES hot dry conditions, so it is well-suited for this spot. I also know from experience that coreopsis blooms non-stop from Summer to Fall, so this plant will provide a constant backdrop for a foreground of changing annuals.


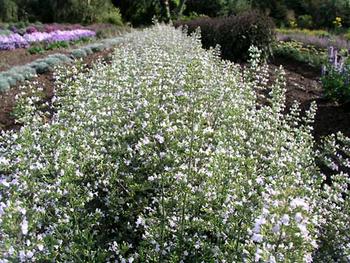
This light and airy Calamintha should soften up the overall look and fill in some of the blank space in the box. This plant is also remarked as tolerating hot dry sites and being suitable for containers.


I also plan to fill in between the perennials with various annuals like:

purple petunias


yellow and white snapdragons


violas


So, this is the plan for now, but I'm sure it will change as soon as I step foot into Jesse Israel's and see their vast selection of perennials this Spring!

Labels: , , , ,

Wednesday, February 27, 2008

First Signs of Spring

Many of the perennials are starting to wake their sleepy little heads up from their Winter slumber. I am excited to see so many teeny green sprigs popping up from the ground! Several of the plants I had feared dead are emerging to let me know they are going to be just fine this year.

This St. John's Wort I received as a transplant from my friend Chleome's garden seemed to be struggling to make it through the Summer. I had no hope for its survival over the Winter, but here it is sending up new shoots! I can't wait to see its pretty yellow blooms.

st. john's wort spreading

This Obedient Plant transplant also seemed to struggle last year, but I can see now that I'm going to have difficulty containing it in the perennial garden. Look at all those new babies!

obedient plant spreading

It snowed last night, and it is funny to see Daffodils just about to bloom covered in snow. I have never had Daffodils bloom this early in the year. I hope their flowers can shake off the frost and persevere! I'll get some photos when they finally start their show.

Friday, February 08, 2008

Take Off Old Man Winter!

Hey, Old Man Winter, I'm talking to you - take off dude! I am tired of brown grass, bare branches and cold winds! I want my garden back! I want my green grass back! I want to hear the happy chirping of little birds in the early morning and feel the warm sun as it rises over the house while I sip coffee on the back porch again!

I am tired of staring at this every day.

winter view of knockout roses

I want to see this again!

front yard view 9 2007

Look what you have done to my beautiful roses! How could you?

winter view of knockout roses

Step aside and let Spring make her way down the aisle so my roses can bloom again!

knock out roses august 2007

Your first breath of frost back in late October was admittedly beautiful, and honestly I was growing tired of watering, fertilizing and weeding the gardens, but I have put up with four months of this weather, and I'm ready to dig again!

first frost

I'm ready to see blooms of life again!

knock out roses august 2007

I am getting antsy. This is a dangerous time for me. A new plant catalogue arrives in the mail daily, and my desire to garden is so strong that I just might start making orders. No! Someone restrain me! I don't have the willpower to fight it! Agh!!!

Thursday, February 07, 2008

Multiplying Irises

I know they look really ratty right now, but I am amazed at how quickly the bearded irises are multiplying! Here they are in September when I first cut them back and divided them. All these plants came from 5 original bulbs that were planted last Spring.

bearded iris divisions

And here they are now. Yes, they look awful, but if you enlarge the photo, you will see that each bulb has turned into at least 2 new bulbs. Isn't that just amazing?

bearded irises

I read that bearded irises can be divided any time after blooming up until August, so I guess I can't divide them in the Spring before they bloom again. I also read that they only need to be divided every three years, but I can't imagine letting these things go for that long. I will probably keep dividing them annually until I get bored of it - LOL!

Some of the new ones are supposed to be rebloomers, so we'll see how well they perform. I'm excited to see their beautiful purple, yellow and white blooms this Spring! Hurry up Winter! I'm tired of you!

Labels: , ,

Wednesday, February 06, 2008

Cleaning Up the Daisies

We took a couple hours on Sunday to clean out the daisy bed that runs along the sidewalk and re-mulch it in an attempt to keep the grass from re-invading. Here is the product of our work:

shasta daisies in winter

The edge is a little crooked, but it looks MUCH better than before! The grass had not only invaded into the sides of the bed, but there was also a lot of grass mixed into the daisies themselves. It was a pain to get all that grass out of there, and I'm sure that when Spring rolls around, we will have to pull out more grass that we missed.

We're going to edge the side of the bed that is touching the lawn with plastic edging to keep from having to constantly weed this bed this Summer. I hope it helps! Grass always seems to grow everywhere you don't want it, but won't grow where it is wanted.

Most of the daisies will be two years old this Spring, so they should really thrive this year. The rule of thumb I have heard with perennials is the first year they sleep, the second year they creep and the third year they leap! Although they have been planted only two years, this is really their "third year" in the ground, because their "first year" is their planting year when they are zero years old. It's like in Computer Science - we count from 0 instead of 1 - very confusing :)

I was very excited to see some daffodils poking their little heads up through the soil this weekend!

spring daffodils poking through

I planted 3 dozen or so daffodils in Fall '06 in the same bed as the daisies, and they did come up the following Spring. I am happy to see that they are going to come up again this Spring since the last bulbs I planted in Fall '05 in this same spot dissolved over the following Summer. I decided not to check on them last Fall, because I didn't want to go through the pain of planting more if these had also dissolved. So, it was a nice surprise to see that we will have some Spring color!

This one is really exciting - check out that bloom getting ready to bust out and greet us all!

spring daffodil popping up

Labels: , ,

Tuesday, February 05, 2008

Digging in the Garden

This weekend provided the perfect weather for digging in the garden. I love these little Spring teasers in the middle of Winter, though they do tend to leave me a bit depressed and yearning for warmer days.

Here is the mess of a garden after our day of hard work. A couple weeks ago we dug out the top left bed, and this weekend I finished digging out the bottom left bed. The soil was nice and soft from the recent rain, which made digging easier, but it made separating the long grass roots from the heavy wet clay a very difficult task.

winter view of the garden

We covered the finished beds with plastic to sterilize the soil. This method is supposed to kill any bacteria, weeds and bugs living in the soil via suffocation. It also keeps the water out, which sounds bad, but prevents the freshly dug soil from becoming compacted by heavy rains. I don't want to dig that soil twice this year!

garden bed in winter

Ian has been burning garden refuse and old rotten wood in the unfinished beds while I dig out the other beds. The ash provides potassium to the soil and also softens it, which makes digging a lot easier. The bed where we grew tomatoes last year used to be the burn bed for generations of previous owners, and the tomatoes were very successful, so we figured we would burn in each of the beds to see if we could reproduce these same results throughout the entire garden.

garden needs to be dug out

We are going to build 10' x 10' wooden garden boxes for each of the four beds this year. We are also going to lay down garden cloth on the paths between the beds and cover them with mulch in an attempt to stave off the grass. I had a terrible time keeping the grass out of the garden beds last year! We will need to outline the entire garden with plastic edging in order to keep the grass from invading the pathways. This is going to be quite an endeavor, but I hope it will provide a permanent solution and keep us from having to dig the grass out of the beds every year.

Seriously, look at this mess. I don't want to have to dig the grass ever again!

garden needs to be dug out

Since we will be spending what seems like a million dollars building garden beds and lining the pathways, I was hoping to spend no money this year on compost, peat or cow manure. The compost tumbler was supposed to provide me with a constant source of lush FREE compost all year long! It has not performed all that well though. I am hoping the cold weather has stunted its ability to compost, but we'll see when Summer rolls around if it performs any better. This batch has been brewing for 4 weeks, so it should be finished, but it's got another 4 weeks at least before all that grass is broken down.

compost tumbler in action

I was digging the bottom left quadrant, disgusted by the heavy red clay and thinking about the fact that I would have to spend another fortune on peat to improve the soil when Ian announced that he found a bunch of compost up in the corner of the yard. I thought he was joking. Compost doesn't just appear out of no where, right? He was not joking! He had found the motherload of compost, just sitting there waiting to be discovered! Apparently he has been dumping grass clippings in the same spot for the past two years, and they turned into compost! It's magic people!

Here is the pile after having removed four wheelbarrows full. I was able to dump two wheelbarrows on each of the two garden beds that have already been dug up, and I think there are 4 more wheelbarrows worth left for the other two garden beds! Oh, it was so sweet! I also used some compost when I repotted the fern. I hope it gave him the energy boost he needed to stimulate his growth. Oh beautiful compost, how you have made my gardening day!

compost heap

I am hoping there is more compost under this heap of garden trash too. Ian has reminded me though that we dumped the gravel from the perennial bed in this spot, so even if there is compost, it might be difficult to access. The evil gravel strikes again!

is there compost under there?

Labels: , , ,

Monday, February 04, 2008

Repotting a Seriously Root-Bound Fern

My Boston fern that sits next to the door during the warmer months has not been enjoying his time indoors this year. (Yes, he is a boy fern - LOL!) Last year he thrived inside the house and seemed disappointed to be put back outside in the Spring, but this year he has developed some brown fronds and is dropping a lot of leaves. When Ian pointed out that there were roots growing out the bottom of the pot the fern has occupied for the last 1.5 years, I realized he was so distressed because he had outgrown his container, so we set off to Bloomfield's to find him a bigger pot.

I found a beautiful brown and red pot with cool glittery flecks that will look nice next to the front door. I like Bloomfield's, because they have a great selection of ceramic containers at decent prices. Right now all their older stock of planters are 40% off! Too bad the one I chose was new and full price. If you're ever traveling I-26 through Asheville, make sure you stop off at exit 53 to visit their shop.

We brought the fern into the front yard to re-pot it. We did this in the front yard not only to amuse the neighbors, but also because the fern sits very near the front door, and I didn't want to parade it through the house and have to clean up the fallen leaves afterwards just to get it into the backyard. Also, I really like to entertain the neighbors. Most of them are much older than us, and they appreciate a good show.

Ian held onto the fern while I pulled with all my strength on the pot, but it wouldn't budge a bit. This was not a good sign. I really wanted to save the old pot, because I love the shape of it, but it was hopeless. We had to smash it to bits with a sledge hammer to get the fern out of it. The neighbors got their money's worth that day! First we tugged and tugged and tugged, then we started smashing things! Woo-hoo!

When we finally got the fern out, I couldn't believe how badly root-bound the poor thing was. I am such a bad fern owner. I should have re-potted him 6 months ago. Shame on me! I also forgot to photograph it which is a shame, because it was really cool looking. The roots were very dense and growing together, but also there were these strange pod-looking things that resembled grapes growing throughout the roots. At first I was afraid they were slugs since slugs LOVE to eat ferns, but upon closer inspection they turned out to be part of the plant. Maybe that's where baby ferns come from - LOL!

I did not even attempt to untangle the roots before re-potting it, because I was afraid of doing more damage than harm. I really hope the fern makes it through this ordeal. It was only a $15 fern, but it has grown to be so big! I would really miss him!

Here is the fern in his new pot.

new pot for the fern

Friday, February 01, 2008

Planning Spring and Summer Containers

We're deep into the Winter months here in North Carolina, and I have been pouring through plant and seed catalogues planning for the coming Spring. One area I plan to focus more attention this year is on my containers. Punchy sent me a wonderful book entitled Containers that has beautiful pictures and great ideas. I look forward to putting that knowledge to use this year. I also got some good inspiration from the Biltmore House this past Summer. I took some photos to use as reference for my own creations.

This smaller scale arrangement does a nice job combining the contrasting colors and textures of the silver dusty miller and the two-tone greenery of the center plant. I don't know the name of the center plant, but a hosta or fern would work in its place if you can't find this exact plant. The splash of pink is quite lovely, and could be achieved with any number of different annuals including; cosmos, pansies, petunias or impatiens. Dusty miller can grow to be very tall, so you would need to keep pinching it back to keep it in check.

biltmore planter

Another smaller scale arrangement that combines contrasting colors and textures to achieve a nice unified balance. You could use a decorative grass or yucca in place of the spikey cordyline as the center plant if you cannot find cordyline. It is usually found in the houseplant section of nurseries. I like the silver artemesia that is used for contrast. There are numerous types of artemesia that could be used depending on availability in your area.

biltmore planter

This hanging basket uses caladiums as the anchor plant. What a novel idea. It would need to be placed in a very shady spot and kept well-watered since caladiums tend to wilt quickly in the Summer sun. You can purchase caladiums as bulbs or growing plants at your local nursery. The plant that is spilling over the side is a form of dichondra and is very popular in container arrangements, but it can be hard to find since it sells out quickly. If you cannot find this plant, you could use any type of weeping plant in its place, including; ivy, thyme, periwinkle, sweet potato vine or nasturtiums.

biltmore planter

Biltmore has a spectacular display of very large containers, most of which are not suited for the typical garden, but there are still some interesting elements that can be modified for a smaller container.

The use of a large potted palm with smaller accent plants is attractive to me. There is a lot of interest in this arrangement, and it keeps the eye moving from plant to plant to create a nice effect.

biltmore planter

Here is a larger palm with an electric blue accent plant, possibly this blue form of Superbells from Proven Winners.

biltmore planter

The plants are just jam-packed into this container to provide a nice medley of hot colors and texture.

biltmore planter

This is a softer spin on the previous container arrangement. The designer is still using reds and burgundies, but they are much easier on the eye.

biltmore planter

Lantana gives this arrangement a fuller, bulkier appearance than the previous arrangements.

biltmore planter

I have so many ideas in my head now that there is no way I can put them all into action, but I look forward to trying out some new ideas this year.

Labels: ,