Wednesday, April 30, 2008

Gooseneck Loosestrife Transplants

Last Fall I transplanted 13 twigs of gooseneck loosestrife from my MIL's garden into my newly created Hydrangea garden. Here is the view in September.

hydrangea garden

I never thought those spindly little twigs would make it through the Fall let alone re-emerge the next year, but they did! I was surprised to see new growth emerging from the ground in March! At first I thought it must be a weed, but then realized it was the gooseneck loosestrife.

gooseneck loosestrife transplant

Altogether, 11 of the 13 plants made it through the Winter. I know a bunny chomped one completely down to the ground, but I don't know what the 13th ones problem is - LOL! I have heard that this plant is hardy, but wow! They werent' kidding!

I sprinkled some 5-10-5 fertilizer around them and am enjoying watching them grow! There are tulips currently crowding out that bed, but I'll post pictures as they grow this Summer.

Labels: , , , ,

Tuesday, April 29, 2008

Tending to the Knockout Roses

When you have a passion for something, you enjoy every task associated with that hobby. I love my roses, and I love tending to them - no matter how tedious the task. I recently spent 3 hours trimming off the dead wood, cleaning up the underbrush and feeding my roses for the first time this season, and I loved every minute of it.

It's amazing how quickly the roses started budding out this year. One day they were naked, and the next they had the first hints of little leaves, and a week later - boom - leafed out completely!

knock out roses spring 2008

I wanted to get the underbrush cleaned out before they leafed out, but it happened so fast that I missed my chance. So, I trimmed off the dead wood, then trimmed the bottom spindly branches a bit so I could reach the underbrush more easily. Knockout roses are a shrub rose and require minimal pruning - removal of dead wood, spindly canes and canes that cross through the center of the bush and rub against adjust canes is sufficient. Pruning should be done in Spring, preferably before new growth begins to appear.

I wore long sleeves and a hat to protect my arms and head when reaching under the bushes. I hauled away 4 wheelbarrows full of decaying leaves that blew in over the winter and old spent mulch.

knock out roses spring 2008

It is important to clean out from under rose bushes each Spring to keep the area beneath roses tidy. Otherwise, nasty bugs like aphids will take up residence and suck the life out of the plants.

Admittedly, my roses already had developed an aphid problem when I finally found time to clean up the underbrush. I knocked the bugs off while pruning the branches, carried some of them away in the underbrush that was hauled off and drowned the rest with a strong jet of water from the hose. I also gave them a good soaking with an organic three-in-one spray. I have never used an organic spray on my roses, but I wanted to give it a shot before resorting to my old chemical standby.

knock out roses spring 2008

Knockout Roses are still roses and are still susceptible to the same diseases and pests of ordinary hybrid tea roses; aphids, japanese beetles, rust and powdery mildew to name a few of the most common. I had to spray my roses last year no less than three times, which is a lot less than hybrid tea roses would require, but probably more than people expect. With this many roses, it takes an entire bottle for each application! I hope the organic solution is as effective, because I would like to move away from chemical sprays in the garden completely.

I have noticed a number of people finding my blog who are searching for a knockout climbing rose. In case you are one of them, there is no knockout climbing rose. I recommend finding yourself a nice own-root rose, possibly from heirloomroses.com.

Labels: , ,

Monday, April 28, 2008

Perennial Flowerbox

The perennials I ordered from Bluestone Perennials for the front flowerbox arrived a couple weeks ago! I am always happy with the quality of plants I receive from this company, and this time was no exception. The plants were packed beautifully and arrived in perfect condition. Most plants are sold in three-cell packs, and although they are much smaller than plants you would find at Lowe's or other garden centers, the quality is incomparable. From my experience, Bluestone Perennials trumps them all.

East Friesland Salvia:

salvia

Early Sunrise Coreopsis:

coreopsis

Calamintha:

calamintha

A view of the entire flowerbox. (There are some straggler tulips and daffodils mucking up the scene. I know I should just throw them out because they didn't bloom this year, but I have trouble throwing things away. I guess I'm a plant pack-rat!)

window box spring 2008

I will take monthly photos to show how quickly perennials from Bluestone Perennials grow. I'm sure these will bloom the first year too!

I top-dressed the soil with compost to give the plants a little jump start into the growing season. You should never fertilizer newly planted perennials with chemical fertilizers, but always wait 1-2 weeks to avoid damaging their tender roots. It is stressful on a plant to be transplanted, and fertilizing the roots only increases this stress. Also, the plants usually have enough left-over fertilizer from their original potting soil to last a while. Always be sure to water the plants thoroughly and keep them well-watered for the first week while they are adjusting to the new site.

When you purchase plants on-line, always take time to harden them off before planting. This involves setting the plants in filtered sunlight for an increasing amount of time over 2-3 days. The first day, set them out in the morning for an hour or two, then bring them back into a shaded area. Increase this time each day little by little. If cold weather is expected, keep them sheltered in a covered porch or garage overnight. When plants are grown in a greenhouse, they suffer shock if they are transferred to a garden site without gradually adjusted them to outdoor conditions. The sunlight in a greenhouse is filtered and less hot than outdoors. If the plants have not been hardened off, and you plant them immediately into a full sun site, they could suffer irreversible damage. Furthermore, you should plant them on an overcast day or near the end of the day so they have time to adjust to the new site without the added stress of the mid-day sun. When purchasing plants from a garden center, be sure to ask the salesperson if the plants have been hardened off. If the salesperson doesn't know what that means, you probably shouldn't buy plants from that store.

I am definitely becoming a plant snob.

Labels: , , , ,

Friday, April 18, 2008

Reseeding the Lawn - The Spring Edition

We reseeded the lawn last Fall, and it is looking good! Ian has already had to mow it twice this year, and it is due for another trimming soon. The new grass is growing in clumps that are a bit distracting at the moment, but I think they will fill in and grow together into a nice full lawn by mid-summer.

View from the porch this morning:

front yard view spring 2008

October 2007:

front yard 10_12

September 2007:

front yard view 9 2007

View from the road this morning:

view of lawn spring 2008

October 2007:

front yard 10_12

September 2007:

front yard view 9 2007

View from the mailbox this morning:

view of lawn spring 2008

October 2007:

front yard 10_12

September 2007:

front yard view 9 2007

Ian sprayed down the dandelions, wild strawberries and purple flower-things this weekend with a weed killer spray. I know, it's naughty to spray chemicals on your lawn, but I don't have the patience or time to pick all those weeds out by hand. We don't make a habit of spraying the lawn very often. I hope this new grass helps smother the weeds out, but I'm not sure lawns work that way. I don't have enough time to invest in the lawn, so what will be will be!

Labels: , , ,

Thursday, April 17, 2008

The Clematis Awakens!

I was pleasantly surprised last week to see that the clematis I planted in April 2006 is finally growing! I had honestly written it off as a failure after it sent up only one tiny little sprig last year. I still watered and fertilized it throughout the summer, but I didn't expect anything more from it. So I'm pretty excited to see it growing and to find the beginnings of blossoms on the ends of the vines! I'm trying to train it to grow up those poles, but it has other ideas that involve sprawling on the ground instead. I think I'm going to win this fight though. I would ultimately like it to grow up the mailbox, but I'll settle for the poles for now.

clematis

Here is a blurry photo of the clematis from April 2006. All I had at that time for taking photos was the camera phone - sorry! You can see its pretty little lavender bloom behind the daisies. It never grew any bigger than that until this year.


I protected the clematis from the low temperatures and potential frost with a trash bag, and he made it through the night just fine. I can't wait to enjoy those gorgeous blooms later this month! Maybe it will bloom for my birthday on the 27th. That would be a great gift.

One of our neighbors has a gorgeous lavender clematis that is so lush and full that it must be close to 10 years old. I will get some photos when / if it comes into bloom this year. I think it was badly damaged last year by the late freeze. I hope it comes back up this year.

Labels: , ,

Tuesday, April 15, 2008

The Garden is Ready for Planting!

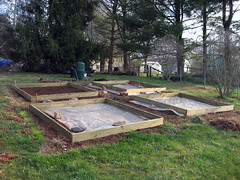
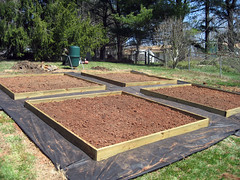
Over the past two weekends we finally finished constructing the vegetable garden. I am so proud of us! We would have finished sooner if the weather had cooperated, but I won't complain about rain after last year's nasty drought.

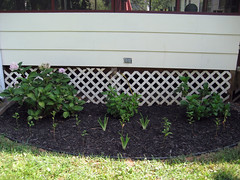
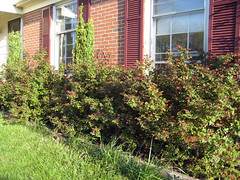
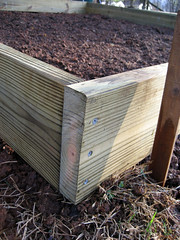
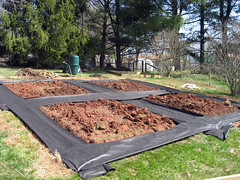
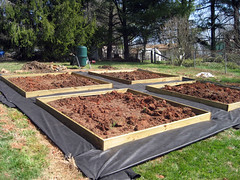
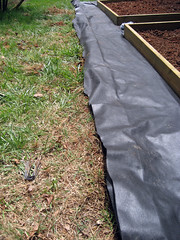
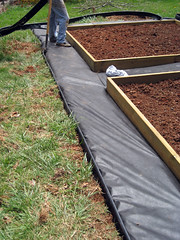
Our first task was to outline the garden with black plastic edging and "tuck" the garden cloth into the gap between the edging and the sod. Sounds easy, yes? Well, this was the most tedious and difficult task yet! I think the work paid off though. Take a look for yourself. (Beware my very white husband is shirtless in some of these photos. You may want to wear your sunglasses.)

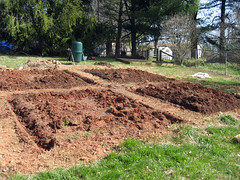
I wanted 18" pathways along the edge of the garden so there is enough room to work from all sides of the garden beds. So, we inserted garden pins at 2' intervals 18" from the garden beds to use as a guideline for inserting the edging. We then used a flat-head shovel to create an outline around the entire garden, indicating where the plastic edging would be inserted.

cutting the outline

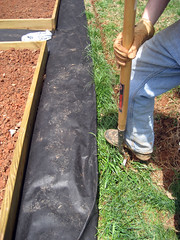
We then cut the garden cloth to about 22", leaving enough room to tuck the extra cloth into the space between the plastic edging and the ground.

the garden cloth

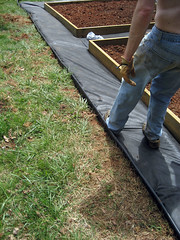
Now for the real fun. One person inserted the flat-headed shovel into the already cut trench and rocked the shovel forward and backward to create a trench wide enough to insert the plastic edging and garden cloth into. The other person shoved the garden cloth into the trench followed by the plastic edging. This was really hard on the back - too much stooping!

inserting the edging

After the entire row of edging was in place, we tamped down the soil on both sides of the edging to ensure the edging stays put; otherwise, it will heave out of its trench. This was difficult too. Our tamping legs were burning by the end of the day!

tamping down the soil

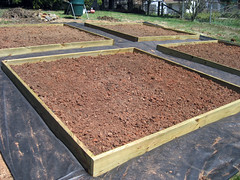
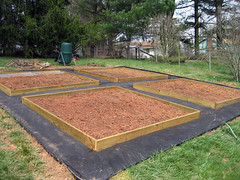
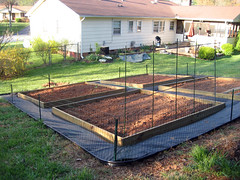
So there you have it - a nicely edged garden.

the outlined garden

This task took about 4 hours to complete, but I will admit that we could have worked faster had we not taken a 30 minute break to dig for earthworms. You know you are tired when you're amused by finding earthworms! We found about 50 worms. I was considering starting a bait and tackle shop - LOL!

the outlined garden

The next weekend we installed the fence. Last year's fence was chicken wire stapled to wooden stakes. It was hideous.

garden_view_5_2007

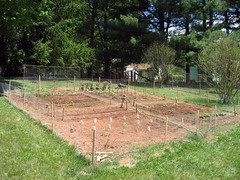
I decided this year that we would invest some time and money into a more permanent fence structure. I still wanted a fence that I could easily step over, but please, no chicken wire. Also, I don't want to have to take it down and resurrect it each year. So, off to Lowe's we went. We didn't find my ideal fence there, but we found something I considered adequate. It was under $100 and it looks a lot better than last year's version. I think I can make do with this fence for a couple years at least. Maybe Ian will construct a nice little white picket fence for me in the future.

finished garden beds

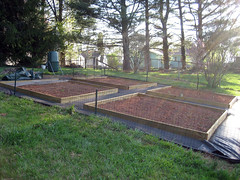
The fence is green plastic-coated wire, much thicker than chicken wire and a lot more aesthetically pleasing. We used green metal stakes with little hooks to which the fence is affixed. (I was looking for these same stakes last year and couldn't find them - which explains the hideous vampire killing wooden stakes of last year.)

finished garden beds

The fence didn't turn out exactly as I had hoped, but I am still happy with it. I wanted to plunge the fence into the ground a couple inches to ensure bunnies keep their little cotton tails away from my crops, but it was going to make the job infinitely longer. The job took over 2 hours as it was, and I didn't want to push my luck with Ian's patience. He has been such a trooper through this all! I am going to buy some garden pins to secure the bottom of the fence to the ground so bunnies cannot squeeze under the fence. Hopefully this will make a bunny-proof structure.

There are two tasks left; 1 - construct a gate, and 2 - cover the garden cloth with mulch. Ian is going to make me a gate sometime in the nearish future. We are discussing how to build the gate at the moment. Since I can step over the fence easily, this is not a pressing issue at the moment. Mulching the garden cloth is no big deal. We just need to buy the mulch and haul it up to the garden. I would leave it uncovered, but the garden cloth is really SLIPPERY when wet, and it gets REALLY hot since it absorbs the sun. I wouldn't want to spend much time up there in the summer, and that would be a problem!

So there you have it. Task completed. Well, almost :) Our next mission is to rebuild the herb box. The herb sale at the Farmer's Market is on the 26th, so we need to get that box built this weekend!

Labels: ,

Visions of Spring

Although it did reach the low 30's last night, my plants all appear to have come through unharmed - even the clematis! I was so happy to uncover my gardens this morning and see everyone alert and perky. Hooray! I will have to cover them again tonight since the forecast is calling for 30 degree temperatures tonight, but this should be the last time! I have to go to Mobile next week on business. I really hope we don't have more cold temperatures while I am gone; otherwise, the plants will have to fend for themselves.

I have been enjoying this white bleeding heart for the past couple of weeks. I have always loved this type of plant, even when I was very young. I was startled when the plant died back just after I planted it last summer, but it was mid-summer, and bleeding hearts go dormant in mid-summer. So, if you want to add this to your garden, keep in mind that you will need to have some annuals on hand to fill in the empty spot they will leave. I recommend white impatiens or maybe some caladiums. If you plant the caladiums now, they should be mature by the time the bleeding heart dies back. That's my plan at least.

white bleeding heart

The plant has lovely foliage too. I was surprised that it grew so large in such a short amount of time. I purchased this from a local nursery.

white bleeding heart

I planted these tulips two years ago, and they have come up both years. I also planted some of these same tulips in Ohio at my sister's house, my great-aunt's house and at my mother's grave. I hope theirs' are all blooming too.

tulips spring 2008

I did not cover these tulips last night, but they were not harmed by the cold. I love the streaks of red. These are the same tulips that the bunny was munching on earlier this spring.

striped tulips

This is the springtime view from the back porch. That forsythia is just unbelievable, and I love the white blooms of the alpine snowcap. I'm going to plant some more of that this year. It only blooms in the spring, but it is a welcome sight after a long winter!

spring view from the back porch

I am eagerly waiting for the bearded irises to send up their first shoots of color. I purchased some new varieties last fall, and I can't wait to see the show they put on!

Labels: ,

Monday, April 14, 2008

Again with the Snow?

It's snowing. It snowed last year on April 11, and it was the latest snow we had recorded in a long time in this area. My clematis that I planted in 2006 was finally growing this spring and ready to show off its lovely lavender blooms, but there is nothing I can do for it now. My Black Gold cherry tree is plump with tender buds, ready to burst forth and welcome the spring. I hope the trash bag I put over its limbs will protect the buds, but I doubt it. Will my hydrangeas go through another barren, bloomless summer? The tarps covering them are probably not enough to keep them safe. I'm pretty ticked off today. I hate you snow.

Wednesday, April 02, 2008

Garden Beds!

We finished the garden beds two weeks ago and installed them the weekend before last. I meant to get the fence installed this past weekend and blog about the whole thing in one post, but it rained, and we weren't able to work on the fence. So, I'll just share the progress report.

We started with 2" x 8" x 10' pressure-treated outdoor lumber that we then treated with Thompson's Water Seal. Last year the garden beds were 9' x 9', but because we could purchase 8' boards or 10' boards, we decided to expand each garden bed by a square foot and just use the 10' boards. We don't own a power saw, and cutting the boards down to 9' would be a little difficult with a hacksaw - LOL! However, once we saw how big a 10' x 10' garden bed would be, we realized it was too big. One foot doesn't seem like a lot, but it really is! Luckily, we found that one of our neighbors owns a table saw, so we borrowed it and cut the boards down by one foot. It wasn't all that difficult. I'm so happy to know they have a saw we can use, because we're going to need it again to rebuild the herb box.

After we cut the boards to size and waited for the water sealer to dry (it seemed like forever), we assembled the 9' x 9' garden beds using three screws in each corner. This wasn't all that difficult either. We thought this was going to be dreadfully painful, but it only took about an hour to assemble all four beds. They were REALLY heavy once assembled though! I pulled some muscles in my back moving them. Ian said I need to learn to lift with my legs. I thought I WAS lifting with my legs!!

raised beds

We then laid the garden beds into their approximate positions in the garden.

raised beds

Using a tape measure, we lined the garden beds up so they were straight with each other and left the necessary amount of walking space between each bed. Next we made preparations to plunge the beds into the ground so they would stay in position. To do this, we used a shovel to "edge" around each bed in order to create an outline of where the bed was sitting. We then removed the lumber and dug a trench around the outline of the bed using the edging "cuts" as a guideline.

garden beds in progress

We then positioned garden cloth on the pathways of the garden, ensuring a 6" overlap into the garden bed to prevent weeds from invading the growing areas. We secured the garden cloth with garden cloth pins.

garden beds in progress

We positioned the lumber in their final position in the trenches.

garden beds in progress

We filled in the trenches with soil and broke up the clumps of clay, grass and weeds. Although we had dug the beds out previously, we found that they weren't all 9' x 9', so we had a little more back-breaking work to do that day!

finished garden beds

All that stirring up of the soil covered my 2" layer of compost with nasty clay. I was sad about that, but I think the beds look fantastic!

finished garden beds

The next step is to edge around the entire garden with a shovel, tuck the garden cloth into the edging trench, push black plastic edging into the edging trench, install the fence and cover the garden cloth with mulch. We need to cover the garden cloth with mulch, because it is REALLY slippery when it gets wet.

The reason for the black plastic edging and the garden cloth is to keep down the weeds. The garden was just overcome with grass last year, so we pondered a permanent solution to weed prevention, and this is what we came up with. We'll see in July whether it is actually working!

I planted lettuce and spinach last weekend, and they have sprouted up successfully. I need to get the peas sown, but we are in the process of rebuilding the bean trellis. Maybe we'll work on that tonight.

Labels: ,