Now is the Time to Plant and Divide Irises
Although irises only need to be divided every 3-5 years, mine have become overgrown and crowded in their first year. The 3 bearded iris rhizomes I planted last Fall have multipled into 8 already, and since I planted them a little too close for comfort in the beginning, it is time to divide them. I also purchased 2 new bearded irises from the Biltmore Garden Center and 2 from the Jesse Israel Garden Center. I love irises! I was so excited to find REBLOOMING irises this year. Holy cow! I had no idea those existed! Now I get to enjoy multiple blooms in a single year. What could be better than that?
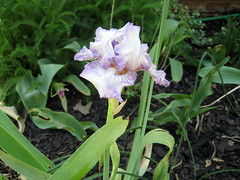
Here is one of my pretty purple blooms from this past Spring.

To divide your irises, dig them up carefully and cut the foliage back to about 4". Wash their roots thoroughly with a jet of water from the hose so you can see the rhizomes clearly. The rhizomes look a lot different than the ones you planted originally, because they are not dormant like they were when you first planted them. Using a sharp knife, cut the rhizomes apart, being careful to leave each division with a nice-sized rhizome and plenty of healthy roots. You should NOT just snap them apart like I did. Although I knew it was wrong when I was doing it, it was just so easy and I could not resist - LOL! I'm sure snapping them won't kill them, but it's not the right way to do things. If any of the rhizomes look diseased, throw them out. Do not compost them! (You should never add diseased plants to the compost pile.)
Irises should be planted even with the soil surface. This means that the tops of the rhizomes should be exposed slightly while the roots are well covered and pointing downward into the soil. This makes me nervous, so I cover my tops with about 1/2" of soil. (If you live in a hot climate, the tops should not be exposed, but covered with about 1" of soil.) With divided irises, you need to be careful to spread their roots out adequately. To do this, dig a hole deep enough for the roots; ie, when holding the rhizome level with the top of the hole, the roots do not touch the bottom of the hole. Create a mound of soil in the center of the hole at a height just below soil level. Set the rhizome on top of the mound and drape the roots around the mound. Now, fill the hole in carefully with soil. Be sure to water the divisions well when first planting. Irises do not appreciate being over-watered, so only water during extensive droughts.
To plant newly purchased irises, I just sort of dig a hole and cover them up. The PROPER way is to build the mound and drape the roots, but the roots are always so rigid and short that this doesn't work for me. So, if your roots are long enough to drape over a mound, then use that method. Otherwise, dig a nice hole and lovingly cover the rhizomes with soil.
Although they look fragile, irises are actually very hardy and easy to grow. They also provide gorgeous foliage throughout Summer. If you interplant then with other perennials, they will provide a lovely scene Spring, Summer and Fall.

0 Comments:
Post a Comment
Subscribe to Post Comments [Atom]
<< Home