Wednesday, May 26, 2010

Colorado Potato Beetles

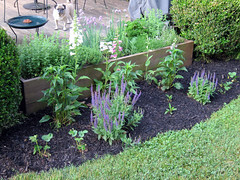
Back in March I planted Yukon Gold potatoes at the bottom of the lower left bed and Red Cloud Hybrid beets at the top. This weekend I finished off the bed by sowing squash in 2' mounds, tucking some extra eggplant between the mounds. Marigolds fill in the empty spaces to help protect against insects.

potatoes, beets, squash and eggplant

As it turns out, marigolds do not help protect against this nasty insect, the Colorado Potato Beetle, identified at its larval stage by its reddish brown ribbed body, black head, and pair of dark spots down either side of the body.

colorado potato beetle larva

According to every article I've read, the Colorado Potato Beetle is a nasty little bugger that quickly builds up resistance to pesticides and will defoliate potatoes, tomatoes and peppers in a short amount of time. Thankfully, my potato beetles are still in the stage 1 larval period, and have not caused much damage.

The small holes in the leaves are from flea beetles, which don't eat a whole lot compared to potato beetles. The potato beetles, on the other hand, join forces with their newly hatched siblings to tear down any potato plant in range!

colorado potato beetle larva

They do the most damage in their stage 4 larval form, which I am trying to keep them from reaching. Since I have just a single 10' row of potatoes, manually squashing them to control the population shouldn't be a problem. I'll have to keep an eye on the tomatoes too, because I certainly don't want them setting their sites on other plants!

Labels: , , , ,

Tuesday, May 25, 2010

Perfectly Unplanned

Last year I planted two foxgloves in the front perennial bed. When the flowers faded, I took Linda Cobb's advice and laid the spent stalks across the back of another bed, hoping they would sprout new babies. I totally forgot about this until an unexpected surprise popped up ...

Foxgloves peeking their heads up over the herb box!

herbs and perennials

They spaced themselves out beautifully across the back of this bed to produce a lovely backdrop for the herb garden.

perennials in the morning

While the parent plants were light yellow, these children range from light yellow to bright pink! I just love nature - she's so unpredictably creative! I hope her next surprise is as good as this one.

Labels: , ,

Friday, May 21, 2010

To Weed or Not To Weed

There is much debate inside my head right now about whether the evening primrose I foolishly planted two years ago is a weed. It is definitely invasive, but it's also quite lovely and pleasantly scented. It is choking the other plants out, and each time I pull it up, it just comes right back. I guess that does qualify it as a weed. Primrose spreads via roots, which makes it more difficult to contain than plants that spread via seed. It has even burrowed under the sidewalk to the soil on the other side!

knockout roses and pink evening primrose

I wish it were just 12" shorter, then I would leave it be, but at 24", it's hiding all my other perennials and spilling onto the sidewalk, which really annoys Ian!

pink evening primrose

I'll probably let the bees gather their last feeding from these blossoms today and yank it out this weekend. I'm sure it will be back in a couple weeks though. Gah ... When the seed packet said, "fills in quickly" I should have known what would happen!

Friday, May 07, 2010

Hardscaping - How to Edge with Stone

Hardscape is a gardening term used to refer to anything structural that is not a plant; ie, bird bath, trellis, rock wall, edging, art, etc. I have been wanting to add some sort of border to the front yard perennial beds for some time, but just haven't been able to find the right material. Most pavers are made of poured concrete that just don't appeal to me. I prefer soft lines and natural materials. During a trip to Home Depot a couple weeks ago, we spotted a new paver made of real stone and decided it would be the perfect hardscape material for edging the beds.

We aimed to edge along the lawn-facing side of the daisies.

knockout roses and perennials

And last year's new perennial bed.

new perennial bed

Step 1 - Outline the Path

Carefully place each stone in its intended position, measuring the proper distance from a common anchor to ensure clean, straight lines. There is nothing more noticeable than a crooked line that was meant to be straight.

Here we measured to ensure each stone is laid 12" from the sidewalk.

building the stone edging

The perennial bed was a little tricky since it is a flowing line of two arches. We employed a bit of high school math by measuring the distance between each of the two arches to ensure they are equal.

building the stone edgingv

Step 2 - Edge the Sod

Use an edging tool to cut a clean, deep line into the sod to denote where to start digging. A flat-head shovel could also be used for this step, but the edging tool is a little more convenient.

building the stone edging

Once the line is cut, gather up the stones and set them aside.

Step 3 - Dig the Sod

The sod can now be lifted out of the ground with a flat-head shovel. Don't use a regular shovel, as the curved blade will ruin your clean line.

building the stone edging

Smooth out the soil to create a flat, even foundation.

building the stone edging

Step 4 - Prepare the Foundation

The whole purpose of edging a bed is to keep a clean, weed-free line. With that in mind, measures must be taken to prevent weeds from growing up between the stones.

Start by positioning a layer of landscape fabric in the newly dug trench. We doubled it over to provide extra protection.

building the stone edging

Next, pour sand over the landscape fabric to create a level base for the stones.

building the stone edging

Step 5 - Set and Level the Stones

Set the first stone in place, and add/remove sand beneath it as needed to create a level appearance.

building the stone edging

Each successive stone is laid at the same level as the previous stone, as close to the previous stone as possible. Try to minimize the gap between stones to keep weeds from sprouting up.

building the stone edging

This can be more difficult on curved areas. Try to keep the curve wide enough to reduce the required gap between stones.

building the stone edging

Step 6 - Fill in the Gaps

Brush polymeric paver sand between the cracks of the stones. Do not use regular sand for this step. Polymeric paver sand hardens when wet. This prevents weeds from growing between the stones and keeps the stones in place.

building the stone edging

Wipe away excess sand with a broom, then use the mist setting of the hose to water in the sand. Be gentle with the hose!

And the project is complete!

building the stone edging

building the stone edging

This project took us about 4 hours to complete, but the benefits will last a very long time.