Monday, June 30, 2008

Anticipation

I am so ready for the tomatoes to begin ripening! Although I enjoying checking their progress from day to day and tending to their needs, I love to eat them even more!

The costolutos are not going to disappoint! Each plant has no less than five bundles of green tomatoes like those pictured below. I am really excited to brew up some pasta sauce from these Italian heirloom beauties!

costoluto tomatoes ripening

The green heirloom tomatoes grown from seed that my MIL harvested from a tomato from the Farmer's Market are threatening to take over the entire garden! I can't believe how well this plant is growing, and it is covered in young fruit. The plant grew too fast for me to cage it, and now I am trying to keep its heavy branches from snapping at the main stalk!

green heirloom tomatoes ripening

A lovely chain of mosaico is forming a tantalizing cascade of fruit.

mosaico tomatoes ripening

Although the Park's early challenge vines are struggling to shake off tomato leaf roll, they are laden with healthy fruit.

park's early challenge tomatoes ripening

I can't wait to sink my teeth into fresh juicy tomatoes! Hopefully it will be just another couple weeks before they turn red. It always seems to take forever, but once they build up some momentum, the garden overflows with delicious fruit for weeks!

Labels: , , ,

Friday, June 27, 2008

Training Hybrid Tomatoes

When growing hybrid tomatoes; i.e., any tomato other than an heirloom variety that grows upright, I have found that it is best to train the plant to one main stalk. To accomplish this, you must go against all natural instinct and pinch off the extraneous shoots that sprout between a 'v' junction on the plant. These shoots are commonly referred to as "suckers."

There are two extraneous suckers that should be pinched off in this photo. The shoot growing out of the 'v' in the lower left and the shoot growing between the 'v' in the upper right should both be pinched off since they are growing between the main stalk and an adjoining stem. Leaving these shoots will cause a second and third "main stalk" to form.

tomato plant side arms

Training tomatoes to one main stem is particularly necessary when using stakes to support the plants. This method allows you to easily tie the plant up as it grows and ensures the stake can support the full weight of the mature plant. If you allow these suckers to grow, the weight of the additional shoots will cause the branches to snap off at the base, and if there is more than one main stalk, it will be difficult to know which stalk to tie up - you will end up having to tie up each of the stalks separately.

parks early challenge tomato

Another reason to remove suckers is to promote fruit growth. You want your plants to put their energy into producing fruit, not producing more green shoots. If you leave the suckers on the plant, you will have smaller fruit and possibly less of it. I admit that there are many schools of thought in this area, but this is the method I have used for the past two years and experienced what I consider great success.

Heirloom tomatoes grow like haphazard maniacs, so it is best to just cage these varieties and let them grow however they choose. We waited too long to cage our heirlooms, and now we are having to tie up their branches to keep them from snapping. We tried to cage them last week, and oh my, what a fiasco that was. Lesson learned for next year! This is our first year growing heirlooms, so I won't be too hard on myself when the branches snap from the weight of the fruit!

Labels: , , ,

Thursday, June 26, 2008

Disinheriting Bad Gardening Habits

My grandparents moved into the house in which my grandmother still lives when I was in kindergarten. For as long as I can remember, my grandfather planted a huge garden each Spring in their backyard. His garden was at least 50' x 30', possibly larger, and was loaded full of tomatoes, onions, rhubarb, green peppers and many other long forgotten crops. To the day he died (at 81 years of age) he maintained a garden. In fact, we served fresh vegetables from his garden at his wake. I liked that idea. It had been too many years since I had enjoyed vegetables from his garden and the tomatoes tasted sweeter that day than I had ever remembered them tasting.

Now that I know what I do about gardening, I look back on my memories of my grandfather's gardening success with a bit of doubt. My grandfather was a "mister" when it came to watering. He hand-watered his crops daily with the spray nozzle set to the mist setting, and watered just the foliage. I know now that plants get no benefit from foliar watering. In fact, they would prefer to keep their foliage completely dry to prevent disease and fungus. Also, light watering will lead to shallow roots since roots grow toward the water source. Shallow roots are easily damaged by a hoe, foot traffic, and by the heat of the sun. Ideally, roots should burrow deep into the ground where the soil is cooler and water that has been absorbed from the surface is stored. Shallow rooted plants require more frequent watering, and are susceptible to damage and disease. This is why you should water deeply at a less frequent interval rather than watering lightly at a more frequent interval. Furthermore, nutrients are absorbed by the roots of a plant by way of water. If the soil is dry, the roots are not getting any nutrients.

Unfortunately my grandfather passed his bad watering habits on to my sister, and she cannot understand why her crops will not grow and bare no fruit. I tried to explain the reason to her, but she has yet to take my advice. She is convinced that she just needs more fertilizer!

My mother was also an avid gardener, having maintained a garden for at least 10 years that I can remember. She, like my grandfather, enjoyed growing vegetables and planted a garden as big as the one he maintained just a mile down the road from her house. Although my mother did abide by the deep watering rule, she was intent on watering at night. Her reasoning made sense to me at the time - water at night so the sun does not evaporate the water. It stands to reason that you would want more water getting into the roots of the plants than is being evaporated into the air, but you actually do want water to evaporate from the surface of the soil and the foliage of the plants; otherwise, you give fungus and bacteria a playground for reproduction. You should always water in the morning, or at the latest, in the afternoon to allow the water to evaporate and prevent it from remaining on the foliage and around the base of the plants overnight.

I do give my mother and grandfather credit for the amount of success they had with their limited knowledge. I never remember seeing either of them reading a book or magazine on gardening, and they definitely did not use the Internet. On one hand I am so fortunate to be equipped with the resources that I have, and I try to use those resources to their fullest, but on the other hand, I wonder if I take my gardening efforts too seriously. Their more casual attitudes toward gardening may have allowed them to enjoy the act of gardening and worry less about the outcome. I can see that I did not inherit my type A personality from either of them!

Wednesday, June 25, 2008

Extreme Drought

Be warned that this post contains some ranting comments regarding our water company's policies. Although the language is tame, the mood is grumpy and might be infectious.

We received a 5-page document from the water company last week that described the new classifications for drought conditions and the respective rules we must follow during those conditions. The letter pointed the reader to the North Carolina Utilities Commission website, which explains the various drought classifications and outlines the rules for water usage under each condition. The website then directs the reader to The North Carolina Drought Management Advisory website to find out the current drought conditions for each county.

We live in Buncombe county, and we have received a fair amount of rain this year. I expected the website to inform us that the drought restrictions from last year had been lifted, but it actually delivered a message entirely to the contrary. I was floored to learn that we are considered to be in an Extreme Drought right now, and the rules we have to follow under these conditions would lead to the quick demise of my gardens if followed. First, I can hand water my flowers any day, but only between 8pm and 8am. I refuse to water at night. Diseases such as powdery mildew are caused by watering in the evening. Plants need the mid-afternoon sun to dry their leaves and keep them healthy. Furthermore, I am permitted to spray irrigate my garden only once a week between 10pm on Wednesday and 1am on Thursday. Are they nuts? Do they think I want to stay up all night watering my garden only to lose the entire crop to a fungus caused by evening watering? I guess alternatively I could stay up all night watering the entire garden by hand any night of the week!

You can probably tell from my tone that they can kiss my butt, and I will let them know this if provoked any further. Water rates with this company are out of control. The lowest water/sewer bill you can hope to pay in a month is $72.50, because there is a minimum usage charge for everyone. If your water service is enabled, but you are out of the country and never use a drop of it, you are going to pay $72.50. $72.50 is more than I pay for electricity most months! Even during the height of Summer watering, we barely use more gallons than the minimum charge allows, sometimes seeing bills as high as $76. I don't feel my water usage warrants such drastic measures as they are imposing, and I refuse to follow these rules.

Interestingly, I see nothing documenting what happens to people who break the rules. Maybe we'll find out soon as I flaunt my hose in front of the meter reader next time he shows his face in this neighborhood. I might even squirt him on the side of the head if he's lucky. On second thought, I'll probably aim for the crotch.

Labels: , ,

Tuesday, June 24, 2008

Touring the Perennials

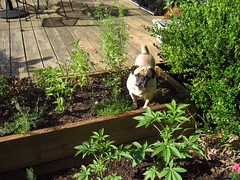
I love perennial gardening. I prefer varieties that put on a show all Summer long (as opposed to plants with shorter bloom seasons like mums and daylilies), and it is so satisfying to see the plants return year after year. Once established, perennials are pretty much maintenance free, requiring just the occasional watering during extreme drought.

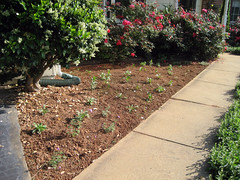
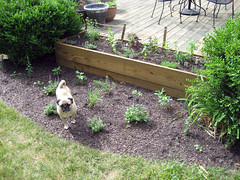
I have numerous perennial beds around the yard, but my favorite has got to be the garden I planted this year from seed. Not because it is any more lovely than the other gardens, but because I feel so accomplished to have grown these plants from seed.

sambuca on the sidewalk

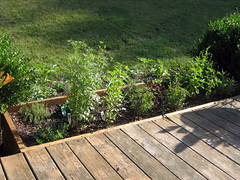
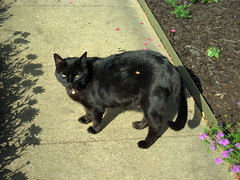
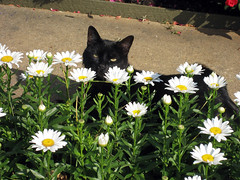
We recently mulched the bed to keep the neighbor cat from using it as a litter box, but she still likes to do her business in there. She has killed four plants with her kitty bombs, but I'm not sure how to keep her out that doesn't involve a BB gun. We also installed edging to keep the mulch in place. I think it looks nice, but I'll be happy when the flowers spill over the side to soften the hard line of the edging.

sambuca on the sidewalk

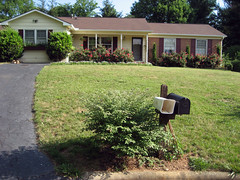
Our front yard is sloped such that you can't actually see this bed from the road, but that's ok. I like to think of this garden as a little "surprise" for people who come up the driveway.

house view late spring

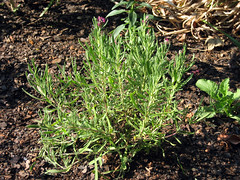
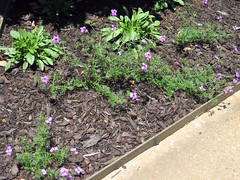
It's hard to believe that this evening primrose was sown just four months ago. All four plants are already blooming! I read that evening primrose blooms open in the evening and close in the morning, but these soft pink blooms are always open in this garden.

evening primrose grown from seed

The perennial verbana has also amazed me with prolific blooms. I didn't think any of the plants would flower this year, but they have proven me wrong! I like to be wrong sometimes ;) The coreopsis doesn't seem far from blooming either!

verbana grown from seed

This is the third year for the daisies, and they are certainly leaping! They have never been so beautiful, and the blooms are lasting longer than ever. I love these shorty daisies. I think they are the perfect height for this area.

sambuca on the sidewalk

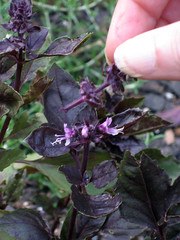
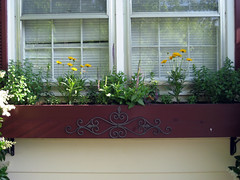
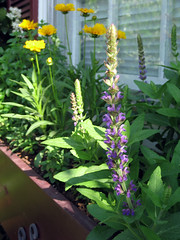
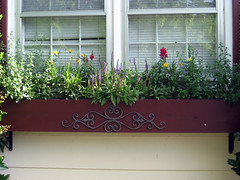
The perennial flowerbox is also thriving. The calamintha is the only plant that wilts in the mid-day heat, but I don't mind watering it. It has a light scent similar to mint, so it's always pleasant to take a break and enjoy the scent for a couple minutes. When I planted the snapdragons, I had no idea what color each plant in the mixed variety was going to be. I was pleasantly surprised to see that the two maroon plants made their way to either side of the salvia. I love symmetry.

flowerbox view late spring

This perennial garden is located in the backyard and is very difficult to photograph for some reason. Its beauty just doesn't come through very well in digital form.

perennial garden late spring

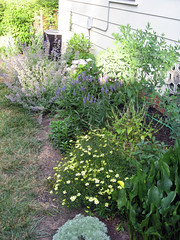
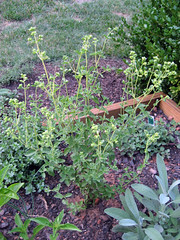
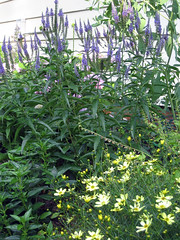
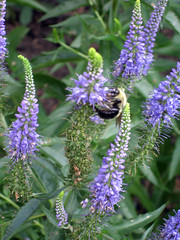
Purple and yellow are quickly becoming my favorite planting color combination. This moonboom coreopsis and purple veronica complement each other in color and height variation.

veronica and coreopsis

Bumblebees love Veronica! They have been busy working to collect every speck of pollen from these plants.

bee on veronica

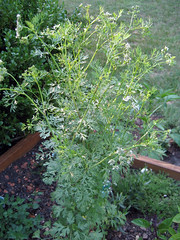
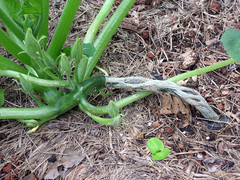
The view from the opposite direction is pretty much hindered completely by the catmint. I had no idea catmint would grow to be this large, especially one year after planting! I will need to cut it back by about two-thirds in the next couple weeks to encourage a second wave of blooms. Note that cats are attracted to catmint. I have chased a neighbor's cat out of the catmint twice in the past two weeks! (It is a different cat than the one who uses the front garden as a litter box.)

perennial garden late spring

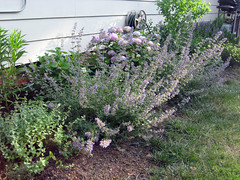
This endless summer hydrangea is being slightly obstructed by the height of the catmint, but the blooms are no less beautiful. I purchased this plant in May 2006, and it is performing beautifully. This is my #1 pick for hydrangeas, at least from my experience with the plants. It should grow tall enough this year to compete with the height of the catmint. Ultimately it will reach a maximum height of 5'.

endless summer hydrangea late spring

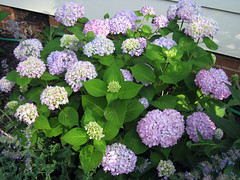
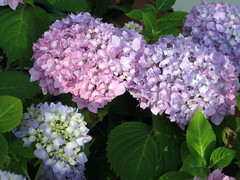
I love the color variation - pink, purple, blue, white. These blooms are gorgeous! This variety blooms on old and new wood, so don't prune it back in Winter.

endless summer hydrangea late spring

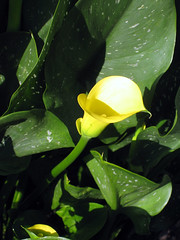
My calla lilies decided to bloom after a break from blooming last year. Callas are my favorite flower. I just wish they bloomed longer, and I will never understand why they are so expensive. They multiply very quickly and tend to be hardier than they are supposed to be. I overwintered these bulbs in the ground, but from everything I have read, they are not supposed to be hardy in my zone! I was so happy to see them emerge from the soil this Spring, because I thought my absent-mindedness has killed them for sure!

yellow calla lilly

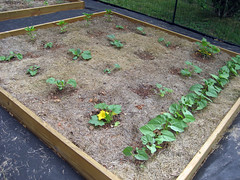
Perennials require a lot of patience since it generally takes three years for a plant to perform at its best. You can fill in the bare spaces with annuals while you are waiting for your perennials to grow, since annuals grow very quickly. Cosmos are a fast-growing full sun favorite that come in many colors and heights. Impatiens are great for shady areas occupied by slow-growing ferns or other shade-loving perennials.

Although annuals last only one season, they are relatively inexpensive, and you get a lot of reward for the cost. Some gardeners like to reserve a place in the perennial garden for annuals to keep the garden dynamic throughout the years. A change in the color scheme of the annuals can change the entire look of the garden. I have not experimented much with annuals, but I am slowly warming up to them.

Labels: , , ,

Monday, June 23, 2008

Eggplant Woes

Although we are still seeing temperatures in the low to mid 50's during the evening, June 20th was officially the first day of Summer. The garden doesn't seem to mind the cool nights, since they are offset by moderate days filled with warm sunshine and an occasional breeze. Thankfully the skies have been generous these past couple weeks, which has allowed me to give the garden hose a needed rest. All the crops are sown, and the garden is now in maintenance mode. Bring on the harvest!

garden view late spring

This bed holds soybeans, eight types of eggplant, the remains of the Spring lettuce and three volunteer marcellino cherry tomato plants that sowed themselves from last year's fallen crop. The marcellino volunteers are abundant throughout the garden. I have been picking them out like weeds, but these three were too far along for me to bring myself to snatch them out of the ground. We love tomatoes, and we have a little extra room in this spot, so I let them stay.

eggplant, lettuce and soybeans late spring

This fake snake helps deter squirrels from digging in the garden. You wouldn't think squirrels could cause much damage, but they will destroy a line of freshly sown seeds by digging around in the soil, and they like to rip up transplants for some reason. (Perhaps this is their way of getting revenge for not being able to reach the bird feeder.) Since I added this snake to the garden, I haven't seen a single squirrel rooting around in any of the beds. It has startled me a couple times too - LOL! You do need to move it around every couple days; otherwise, the squirrels will grow wise that it is a fake.

eggplant and fake snake

A closer look at the eggplant will reveal a series of holes chewed through the leaves. There is a type of insect called a flea beetle that FEASTS on eggplant leaves, and is the culprit here. I never heard of a flea beetle until I planted eggplant, which makes me wonder what they eat when there is no eggplant available. If they were casual munchers who just left harmless holes in the leaves, I would give them cart blanch, but flea beetles are greedy - they will gorge on the plants until nothing remains but a lifeless stick. Would they rather die than eat something other than eggplant, or is the insect communication chain so efficient that every flea beetle in town was notified the minute I set out my transplants? I am frustrated to no end by these insects, but I am also fascinated by the way they find their target crops.

eggplant damage from flea beetles

I have made it a loose rule to not use chemical insecticides on the vegetable crops, but the flea beetles have forced my hand. I love eggplant fruit. They love eggplant foliage. If I do not keep them from eating the foliage, I will not get to eat any fruit. I tried my organic spray for the first four weeks, but I think the flea beetles liked the taste of it, because their numbers only increased. I finally resorted to Sevin. You can only apply Sevin four times during the growing season; otherwise, nasty residue builds up in the soil that causes damage to future crops. I have applied the Sevin twice already, but the flea beetles keep coming. I have resorted now to picking them off several times a day. It's a good thing I work from home.

One variety of eggplant seems resistant or possibly less tasty to the flea beetles since it has far less holes in it than the others. Since I lost track of which type I planted in which space, I will have to wait until harvest to identify the plants. As long as the fruit is good, I will be sure to plant more of these resistant varieties next year and possibly omit the least resistant from the line up.

Gardening is one of the few disciplines where, even if you do the same thing every year, you will learn something new. The ecosystem around us is constantly changing, and the growing conditions are never exactly the same. It's best to just be flexible, never be surprised by anything and have a good time learning something new (even if it is a tragic lesson).

Labels: , , , ,

Friday, June 20, 2008

Notes on Herb Gardens

Despite not being able to keep the dog out of the herb garden, the plants are all performing beautifully. They continue to bounce back from his constant trampling, determined to stand up to his mischievous little paws. I persistently reprimand him for his actions, but he conveniently fails to understand my words and goes about his business as usual.

norman in the herb garden

Herbs are actually very easy to grow, and most thrive when neglected rather than pampered. Most herbs are annual plants originating from the Mediterranean, where the soil is sandy and dry and not all that rich in nutrients. Most hybrid varieties that we grow today still prefer the conditions of their foreplants - keep them on the dry side, and don't fertilize. The one exception I have found is chamomile, which prefers a damp soil and will wilt dramatically when the soil shows the first signs of drought.

An annual plant is one that lives for at most one year, with the sole purpose of reproducing. Annuals are like the flies of the plant world - purposed to reproduce and then die. Once an annual produces seed, it dies back and lets its offspring carry on the family line.

herb garden late spring

Some annuals are intent on producing seed very quickly and must be tended to promptly to help prolong their lives. When annual basil begins to flower, it is wise to pinch the flowers back not only to keep the plant from dying, but also to encourage new growth.

This red rubin basil is determined to go to seed, but I have been quick to interfere with its plans on a daily basis.

red rubin basil

Pinching the flowers back is very easy and can be done with no special tools - you just need a finger and a thumb. Grasp the base of the flowering stem between your finger and thumb and pinch with your thumbnail to prune off the flowering growth.

pinching back red rubin basil

This method will actually encourage the plant to produce even more flavorful sprigs.

pinching back basil

The plant has not actually "gone to seed" until the flowers begin to produce seed, so you do not have to be too quick to pinch off the flowers. If you enjoy the look of the flowers, you can wait until they begin to fade before pinching them off, as you do with decorative annuals. Shearing off spent flowers from decorative annuals will keep them in bloom longer and promote new bushier growth and more prolific flowering.

Cilantro is one herb that is especially intent on going to seed at an early age. When you are finished harvesting your cilantro or just tired of fighting its desire to flower, let it go to seed. You can then harvest the seeds for use in the kitchen, as this is where coriander originates.

cilantro

Our marjoram has also been insistent that we allow it to flower, but I continue to pinch it back with each attempt.

marjoram

We designed a cute little flower garden in front of the herb garden in our attempts to keep the dog out of it, but it has not worked so far. The flower bed contains annual and perennial ornamentals such as cleome, canterbury bells and salvia, and additional herbs such as fennel, lemongrass and lavender.

herb garden late spring

I am hoping that once the cleome is taller, he will get the point. Maybe I should have planted some roses here so he really would get "the point" when he launched into the air. Cleome (otherwise known as spider flower for its spider-like blooms) is an annual in our region and grows to 4 feet in height. I grew these plants from seed sown in mid-February. The seeds took a really long time to germinate, and I had actually written them off as a failure after 4 weeks with no sprouts. They surprised me one day when they finally sent up shoots from their long forgotten peat pods. Although they were slow to germinate, the success rate was near 100%.

chleome

I sowed these perennial canterbury bells around the same time as the cleome, but they have been much slower growing and have had a lower success rate than expected.

canterbury bells

I found these lavender plants on the clearance rack at Lowe's for just $1 each! I don't recommend purchasing "bargain" plants for an area that you really care about, but these plants looked strong and unstressed. Usually the bargain plants at Lowe's are beyond recovery, but these plants were in perfect condition. When I went back the following week though, they had all but killed the remaining lavender on the bargain rack. I guess that's where they send plants to die.

lavender from the sale rack at lowes

We have enjoyed the herb garden very much. We enjoy their decorative qualities, we love to lounge around on the deck taking in their spicy odor, and of course, we appreciate the flavor they add to our dinners!

Labels: , ,

Wednesday, June 18, 2008

Splitting Sqash Stems

Last year I sowed my squash indoors and transplanted them to the garden. This year I planned to do the same thing, but only 4 out of 16 seeds successfully germinated indoors, so I had to resow outdoors. I have already documented some of the reasons why you should sow squash directly outdoors instead of starting them indoors, but I recently discovered another reason that involves splitting stems in transplants.

This squash was sown indoors and transplanted into the garden. Notice that the main stem is long and split in many places. This makes the squash susceptible to stem rot and boring insects. This same thing happened to my squash plants last year, and although they did produce fruit, they did not produce abundantly and they died earlier in the season than I thought they should.

indoor sow yellow squash

Compare the above results with a plant that was sowed outdoors. This is the same type of squash, but the main stem looks completely different. First, the plant is sitting more upright instead of sprawling on the ground, and second, there is no splitting in the stem.

direct sow yellow squash

The 12 plants that were sown outdoors are also larger and will most likely produce more fruit than their counterparts that were sown indoors. Squash seeds germinate very quickly, and the plants grow fast, so you are not losing any time by waiting to sow outdoors. I am glad I had such a low success rate with indoor sowing this year so I could learn this very valuable lesson!

Other plants I have grown that prefer direct sowing are; peas, beans, lettuce, spinach, corn and carrots.

Labels: , , ,

Tuesday, June 17, 2008

Tomato Leaf Roll

We are growing five types of tomatoes in the garden this year; Marcellino, Park's Early Challenge, Costoluto, Mosaico, and a green heirloom grown from seeds from a tomato from the WNC Farmer's Market. I started all the plants from seed indoors in late February and transplanted them into the garden in mid-May. They are staked with rigid conduit from the electrical supplies section of Lowes. I tried bamboo last year, but my monster tomato plants snapped them right in half, and I'm sure they could take down those wimpy tomato cages in no time!

tomatoes late spring

Most of the tomatoes are doing well, but I noticed last week that the plants on the right side of the bed are exhibiting strangely shaped new leaf growth. I looked this up on the Internet and found that it is a condition called tomato leaf roll and can be caused by a number of factors. Note how the leaves are very pointed and curled up on themselves.

tomato plant with leaf roll

Since there are no signs of disease on the leaves, and I see no signs of insect infestation, I can only conclude that the problem is due to herbicide damage. Since the only tomatoes affected are on the far right side of the bed, one of our neighbors must have recently sprayed their lawn for broad leaf weeds such as dandelions and my tomatoes were hit with the over spray. Sadly, I did have to replace two of the plants since they were so badly stunted that I can't imagine they would produce fruit. Luckily I have MANY extra plants eager to move from their peat pots into the lush soil of the garden.

I am keeping a close eye on the remaining plants, and although two plants are still showing signs of tomato leaf roll, I am hoping they will pull out of it. This plant still has a slight rolling of the new leaves, and the existing leaves are elongated, but it is still growing, so hopefully it will be ok. If it fails to set fruit with the rest of the crop, I will replace it.

tomato recovering from leaf roll

Another possible explanation for the herbicide damage could be that the grass clippings we used to mulch the tomatoes had residue left over from Ian's spring spraying of the lawn. This seems less probable though, since all the clippings came from the same mowing but only one side of the bed was affected. This has, however, taught me to be very careful when mulching with grass clippings. I am also trying to convince Ian that he needs to retire his lawn care spray gun, but he hasn't agreed yet. I'm still working on him though!

Labels: , , ,

Friday, June 13, 2008

Sugar Snap Peas

We have eagerly awaited the first sugar snap pea harvest since the beginning of Spring! Sugar snap peas are so juicy, tender and sweet - we just love them!

These blossoms will each turn into a pea pod, and they do so relatively quickly.

sugar snap pea blossom

You can start harvesting these goodies when the peas have filled out enough to give the pod a nice "full" look. The pods should still be crisp and green, never limp, leathery or yellow. If you leave them on the vine too long, they will be bitter and too tough to eat. If you harvest them too early, the sugars will not be as sweet and the peas will be hard.

sugar snap peas ripening

If you harvest the peas regularly, the vines will produce a second and sometimes third crop. Each successive crop will be smaller than the previous. Sugar snap peas prefer cooler weather, so once the dog days of Summer arrive, the vines will become stunted. You might as well pull them up and replace them with green beans at that point. You can prolong the harvest by planting sugar snap peas in part shade in order to shelter them a bit from the hot afternoon sun, but at some point you will have to say goodbye to them until late Summer, when you can sow your second crop, about the same time you would sow your lettuce and spinach crop.

Sugar snap peas are eaten in the pod - you don't shell the peas. For this meal, we gave them a quick boil - maybe for three minutes - then poured a honey reduction over them. Alternatively, you could pour a little melted butter on them or just salt them a bit. They are sweet and refreshing and make a great accompaniment to any meal.

first sugar snap pea dinner of 2008

Labels: , , , ,

Thursday, June 12, 2008

Downpour

We have had an unusually hot Spring here in North Carolina, and it has also been very dry. Most people fear another drought this year, and rightly so since we seem to be headed in that direction. I have been watering all the plants every day for the past two weeks trying to keep them from shriveling up and dying, but the lawn is already brown and dead. We're not even going to try to repair the lawn this early in the season since the real heat of Summer hasn't even hit us yet. It seems like a futile endeavor when the baking sun of July is just around the corner to undo all the work we will put into lawn care in June.

We have been teased with hopes of rain for the past two weeks. Each day we were given between a 30-60% chance of rain, and each day around 2pm the thunder would roar in the distance, but no rain would come. Tuesday was no different. The thunder roared, but the sky was clear. The rain was falling on some other lucky lawn off in the distance. I finally gave in and watered the plants around 2:30pm. You can imagine my surprise when, at 3pm, the sky grew suddenly dark and the clouds let loose with the most torrential downpour of rain I have seen in this area in 3 years. It poured for 2 1/2 hours, then continued to rain more gently for another 2 hours. Although the heavy rains tore up my fresh mulch and flooded some of the garden beds, I'm not complaining. I only hope the skies are this generous in the future. That downpour has saved me the trouble of having to water the plants for the past two days. Let's keep our branches crossed that we get some more.

Labels: ,

Thursday, June 05, 2008

Perennial Garden from Seed

The perennials I am growing from seed are doing beautifully. I lost one salvia and one verbana since transplanting into the garden, but I blame the neighbor cat who decided to use this new garden as his bathroom. Blasted cats ...

It still looks kind of strange to have a large plot of dirt with some teeny little plants poking up, but they are growing a lot faster than I had expected.

new perennial garden

The verbana is already blooming!

lavender verbana

I also noticed an evening primrose in bloom last night. I just can't believe how fast these plants are progressing.

Here is a list of the perennials I sowed in February for this bed:
  • Purple Coneflower
  • Salvia
  • Verbana
  • Coreopsis
  • Shasta Daisy
  • Ruber
  • Evening Primrose
I purchased the seed packets from the Jesse Israel Garden Center. The verbana, coreopsis and evening primrose have been the most vigorous, although the verbana were painfully slow to germinate and the evening primrose had a shaky start in the garden. The salvia had a high germination rate, but also a high damping off rate (while still indoors), which was disappointing. The coneflower and shasta daisy have performed satisfactorily both in germination and in the garden. The ruber has been the hardest to grow. The germination rate was low, the damping off rate was high, and they have been very fickle in the garden.

If I had to recommend just one perennial to grow from seed from my experience, it would be coreopsis. The seeds germinate and grow quickly, and they are very drought tolerant. Also, they are easy to find at any garden center.

Growing perennials from seed is intimidating to many people, but honestly, it is not that difficult. You can sow them in individual peat pots or in a tray of potting soil. Just be sure to keep the soil moist but not water logged (it is best to water from the bottom), and keep them in a warm location out of direct sunlight until four true leaves form. Some people place their seed trays on top of the refrigerator to absorb the heat emitted from it. I place mine in front of a window with the shades drawn. I also use a clear plastic cover on top of the tray to create a mini greenhouse. This helps preserve moisture and keeps it warm inside the germinating tray.

Before transplanting your seedlings into the garden, be sure to harden them off over a week or so by placing them in filtered shade for a couple hours each day and eventually moving them to direct sunlight for the entire day. You want to slowly acclimate the tender plants to the harsh conditions of the sun so they are not fried up by sudden exposure.

It's fun! Give it a try. Seed packs are pretty inexpensive, and it's so rewarding when you see that first little seedling emerge from the soil! Just give them lots of TLC, but don't suffocate them with worry :)

Labels: , , , ,

Tuesday, June 03, 2008

Sowing Squash

Last year I grew only four crookneck squash plants, and we really regretted growing so few because they were delicious and didn't last long. This year I am growing sixteen squash of four different varieties.

squash, pepers and green beans in the vegetable garden

I learned this year to be patient when sowing squash, and wait to direct sow them in the garden when night time temperatures stay above 55 degrees. This takes discipline for me, but I have learned my lesson. I sowed sixteen squash seeds indoors this year, and only four of them germinated! That's only 25% - not good. Later when I sowed the seeds outdoors, the rates were higher, but still nothing to brag about - about 50% success. Be sure to sow three seeds per hole so you have a better chance of successful germination. Don't try to "save" the extra seedlings by pricking them out of the soil and transplanting them - squash will not tolerate disturbances to their roots. You will end up with a stunted plant that produces little (if any) fruit.

A squirrel decided to gnaw down one of my squash plants, so I had to resow it today. What is it with squirrels? One of them dug up one of my eggplant transplants too! I suspect a pack of squirrels with some sort of vendetta against me, probably related to the fact that the birdfeeder is positioned out of their reach. I bought a fake snake to scare the little buggers away from the garden. So far it has scared me a couple times, so hopefully it is having some effect on the squirrels too! When you place a fake snake in the garden, you need to move it around the garden regularly. Otherwise, the squirrels realize it is a fake, because it never moves. Those pea brained critters are pretty darn smart. Too smart if you ask me!

You'll notice that I don't build mounds for my squash. I really don't see a strong reason to give up so much garden space for the sake of mounds. Maybe someone out there can convince me otherwise.

Labels: , , , ,

Monday, June 02, 2008

Perennial Flowerbox

The perennials in the flowerbox are really doing great. The salvia and coreopsis are both beginning to bloom, and the calamintha should be blooming soon. I had to thin out some of the perennials, because seven large plants was a bit too much for the space. I removed two salvia from the sides and left the one in the center. I didn't want the plants to be so crammed in there that there was no room for growth.

perennial flowerbox

This plant combination reminds me of a miniature wildflower field. I just love it. I especially like the purple / yellow color combination. It really reflects what I consider to be my personal style as a gardener. To me, pastels are "old-fashioned," white is "classic," etc, and although I like a lot of different styles, this flowerbox feels like me.

perennial flowerbox

I mixed in some multi-colored annual verbana and snapdragons for additional contrast, but they haven't been too excited about growing yet. Hopefully they'll find their energy burst soon. I like to mix in annuals, because they add a quick splash of color when the perennials are fading, and I can change them out with each season so the flowerbox isn't static all year long.

When I reorganized the perennials in the flowerbox, I transplanted the two extra salvia plants to the backyard. I was hoping to deter the dog from launching off the herb box by planting a flower garden in front of it, but he still launches from the box and now pees on the flowers beneath it. Maybe when / if they get taller he will find another place to do his business.

herb box

Labels: , , , ,